How to Install Teranode with Kubernetes Helm
Last modified: 29-October-2025
Index
- Introduction
- Prerequisites
- Deployment with Minikube
- Verifying the Deployment
- Production Considerations
- Other Resources
Introduction
This guide provides instructions for deploying Teranode in a Kubernetes environment. While this guide shows the steps to deploy on a single server cluster using Minikube, these configurations can be adapted for production use with appropriate modifications.

Hardware Requirements
For detailed hardware specifications including per-service resource requirements, see the System Requirements document.
Kubernetes deployments require:
- Sufficient cluster resources for Teranode pods
- External dependencies (Aerospike, PostgreSQL, Kafka) deployed separately or as managed services
- ReadWriteMany (RWX) storage for shared blob storage
Prerequisites
Before you begin, ensure you have the following tools installed and configured:
Additionally, ensure you have a storage provider capable of providing ReadWriteMany (RWX) storage. As an example, this guide includes setting up an NFS server via Docker for this purpose.

Download the Teranode source code
Deployment with Minikube
Minikube creates a local Kubernetes cluster on your machine. For running Teranode, we recommend the following process:
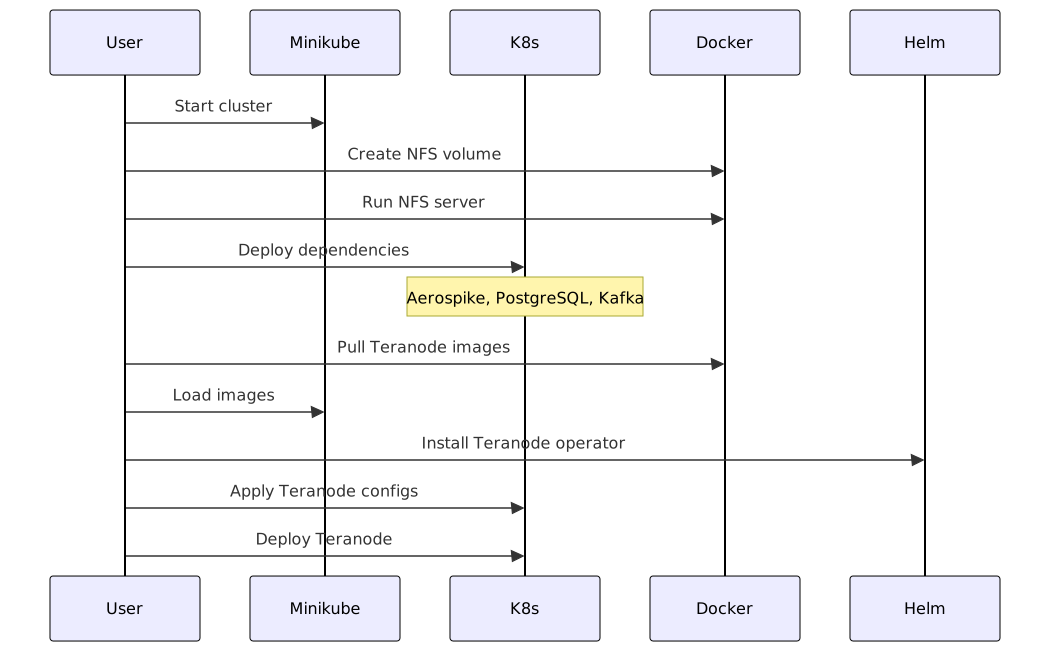
Start Minikube
Start minikube with recommended resources and verify its status:
# Start minikube with recommended resources
minikube start --cpus=4 --memory=8192 --disk-size=20gb

# Verify minikube status
minikube status
Deploy Dependencies
Teranode requires several backing services. While these services should be deployed separately in production, for local development we'll deploy them within the same cluster.
Create Namespace
Create a namespace for the deployment:
Deploy Backing Services
Deploy all dependencies in the teranode namespace:
kubectl apply -f deploy/kubernetes/aerospike/ -n teranode-operator
kubectl apply -f deploy/kubernetes/postgres/ -n teranode-operator
kubectl apply -f deploy/kubernetes/kafka/ -n teranode-operator
To know more, please refer to the Third Party Reference Documentation
Create Persistent Volume Provider
For this example, we will create a local folder and expose it to Minikube via a docker based NFS server.
Standard x86/x64 Systems
docker volume create nfs-volume

docker run -d \
    --name nfs-server \
    -e NFS_EXPORT_0='/minikube-storage *(rw,no_subtree_check,fsid=0,no_root_squash)' \
    -v nfs-volume:/minikube-storage \
    --cap-add SYS_ADMIN \
    -p 2049:2049 \
  erichough/nfs-server

# connect the nfs-server to the minikube network
docker network connect minikube nfs-server

# create the PersistentVolume
kubectl apply -f deploy/kubernetes/nfs/
Load Teranode Images
Pull and load the required Teranode images into Minikube:
Identify Available Versions
You can find the latest available version published on GitHub Container Registry:
- https://github.com/bsv-blockchain/teranode/pkgs/container/teranode
- https://github.com/bsv-blockchain/teranode-operator/pkgs/container/teranode-operator
Set Image Versions
# Set image versions (please derive the right TERANODE_VERSION from the results of the previous command)
export OPERATOR_VERSION=v0.2.8
export TERANODE_VERSION=v0.14.4
export GHCR_REGISTRY=ghcr.io/bsv-blockchain
Load Images into Minikube
# Load Teranode Operator
docker pull $GHCR_REGISTRY/teranode-operator:$OPERATOR_VERSION
minikube image load $GHCR_REGISTRY/teranode-operator:$OPERATOR_VERSION

# Load Teranode Public
docker pull $GHCR_REGISTRY/teranode:$TERANODE_VERSION
minikube image load $GHCR_REGISTRY/teranode:$TERANODE_VERSION
Deploy Teranode
The Teranode Operator manages the lifecycle of Teranode instances:
Install Teranode Operator
# Install CRDs first
kubectl apply --server-side -f https://raw.githubusercontent.com/bsv-blockchain/teranode-operator/$OPERATOR_VERSION/deploy/crds.yaml
# Install operator
helm upgrade --install teranode-operator oci://ghcr.io/bsv-blockchain/helm/teranode-operator \
    -n teranode-operator \
    -f deploy/kubernetes/teranode/teranode-operator.yaml
Create the Teranode Secret
Sensitive settings (blockchain_store and utxostore — they contain database
credentials and connection strings — plus grpc_admin_api_key) are not stored in
the ConfigMap. They are supplied through a Kubernetes Secret named
teranode-operator-secrets, which the Cluster CR references via spec.envFrom. This
Secret is intentionally not committed to the repository — you must create it yourself.
grpc_admin_api_key is required for Blockchain startup and all of its clients,
including reads and subscriptions. Empty, placeholder and weak keys cause a startup
configuration error. It also authenticates protected P2P/Legacy operations. Generate
one random value with openssl rand -hex 32 and supply it to every service and CLI
client through the Secret. For upgrades, deploy credential-capable callers first
and Blockchain last; see Blockchain authentication.
Create it with a manifest (replace the example values with your own credentials):
# teranode-secret.yaml — DO NOT commit this file
apiVersion: v1
kind: Secret
metadata:
  name: teranode-operator-secrets
  namespace: teranode-operator
type: Opaque
stringData:
  blockchain_store: "postgres://POSTGRES_EXAMPLE_URI_CHANGE_ME"
  utxostore: "aerospike://AEROSPIKE_EXAMPLE_URI_CHANGE_ME"
  # Required. Blockchain refuses to start without it. Every service and CLI client
  # uses it to call Blockchain and the protected P2P/Legacy RPCs.
  # Generate with: openssl rand -hex 32
  grpc_admin_api_key: "" # REQUIRED: paste the generated shared secret before applying
The keys in the Secret are injected into the Teranode pods as environment variables, overriding the corresponding settings. Keep the Secret out of version control and rotate the database credentials for production deployments.
If you manage your keys via different secret providers (1password, External Secrets, Vault), please make sure that the secret passed to Teranode Operator is ready.
Apply Teranode Configuration
Apply the Teranode configuration and custom resources:
kubectl apply -f deploy/kubernetes/teranode/teranode-configmap.yaml -n teranode-operator
kubectl apply -f deploy/kubernetes/teranode/teranode-cr.yaml -n teranode-operator
Network Configuration:
By default, this configuration deploys Teranode to connect to the teratestnet network. To connect to a different network:
-
Edit
deploy/kubernetes/teranode/teranode-configmap.yamland change thenetworksetting:- For BSV testnet:
network: "testnet" - For BSV mainnet:
network: "mainnet"
- For BSV testnet:
-
For testnet or mainnet, you must enable the legacy service in
deploy/kubernetes/teranode/teranode-cr.yaml:legacy: enabled: true spec: deploymentOverrides: imagePullPolicy: Never replicas: 1 resources: requests: cpu: 100m memory: 256MiThe
imagePullPolicy: Neverandcpu: 100m/memory: 256Mivalues above are Minikube/local-dev defaults — the legacy service scans the full historical chain and needs far more than that in practice. For testnet or mainnet, size resources from the shipped mainnet CR instead, which requestscpu: 2/memory: 64Gifor legacy: see teranode-cr-mainnet.yaml. -
Apply the updated configuration:
Start Syncing Process
A fresh Teranode under the operator context starts in IDLE. After checking the
deployment, start synchronization explicitly:
kubectl exec -it $(kubectl get pods -n teranode-operator -l app=blockchain -o jsonpath='{.items[0].metadata.name}') -n teranode-operator -- teranode-cli setfsmstate --fsmstate catchingblocks
To know more about the syncing process, please refer to the Teranode Sync Guide
Verifying the Deployment

To verify your deployment:
# Check all pods are running
kubectl get pods -n teranode-operator | grep -E 'aerospike|postgres|kafka|teranode-operator'

# Check Teranode services are ready
kubectl wait --for=condition=ready pod -l app=blockchain -n teranode-operator --timeout=300s

# View Teranode logs
kubectl logs -n teranode-operator -l app=blockchain -f
Production Considerations
For production deployments, consider:
- Deploying dependencies (Aerospike, PostgreSQL, Kafka) in separate clusters or using managed services
- Implementing proper security measures (network policies, RBAC, etc.)
- Setting up monitoring and alerting
- Configuring appropriate resource requests and limits
- Setting up proper backup and disaster recovery procedures
An example CR for a mainnet deployment is available in kubernetes/teranode/teranode-cr-mainnet.yaml.
Scaling the Propagation Service
The propagation service is stateless and horizontally scalable: set
propagation.enabled: true (both shipped example CRs ship it disabled) and
propagation.spec.deploymentOverrides.replicas in teranode-cr.yaml (or
teranode-cr-mainnet.yaml) to the desired pod count, then re-apply the CR. If
the propagation spec has no deploymentOverrides block yet — as in
teranode-cr.yaml — add one.
Not every service in the Cluster CR can be scaled this way. The validator can:
teranode-cr-mainnet.yaml runs it with 8 replicas (teranode-cr.yaml ships the
validator disabled, with an empty spec). Services such as block assembly and
blockchain are single-instance — block assembly holds the mining jobs handed to
miners and its assembler state per process, so a second replica would lose
solved blocks and clobber that state. That is why every
deploymentOverrides.replicas entry in both example CRs is 1, the one
exception being the validator in teranode-cr-mainnet.yaml.
A HorizontalPodAutoscaler that targets the Propagation custom resource's
/scale endpoint will not work. The Teranode Operator's Propagation CR does
declare a Kubernetes /scale subresource, with its specReplicasPath pointing
at .spec.deploymentOverrides.replicas, which is the mechanism an HPA would
normally use to target a custom resource directly. In practice this doesn't hold
up: the parent Cluster controller reconciles every child resource, including
Propagation, both on a fixed one-minute timer and whenever the Propagation
object's spec changes (which an HPA writing to /scale would trigger). On each
of those reconciles it overwrites the entire Propagation spec — including the
replica count — with whatever is stored in the Cluster CR itself. Any replica
count an HPA writes to /scale gets reverted within at most a minute, so
autoscaling against that endpoint silently flaps rather than converging.
Until the operator changes this reconcile behavior (e.g. by leaving
externally-managed replica counts alone), manual scaling via
deploymentOverrides.replicas in the Cluster CR remains the supported way to
size the propagation service.
Related Documentation
Resetting Teranode
If you need to reset your Teranode deployment, see the How to Reset Teranode guide for complete instructions on cleaning up Aerospike, PostgreSQL, and persistent volumes.